Robotic Arm Testbed
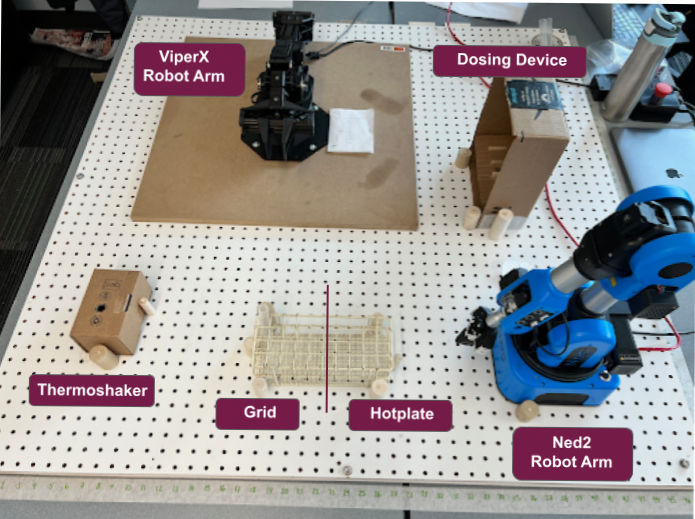
We designed and implemented a robotic arm testbed that emulates a small-scale self-driving laboratory.
This testbed serves as a platform for performing experiments with robot arms and devices that have less precision and quality. It provides an environment for executing potentially unsafe programs, eliminating concerns regarding extensive damage or hazards on a large scale. We designed three experiment workflows on the testbed that are described below.
Workflow No. 1: Dose, Shake, and Heat using One Robot
We use the ViperX robot arm to move the vial between different locations according to the following steps.- Open the door of the dosing device.
- Move the vial from the grid to the dosing device.
- Close the door of the dosing device.
- Place an amount of substance in the vial using the dosing device.
- Stop the dosing device from adding substance to the vial.
- Open the door of the dosing device.
- Move the vial from the dosing device to the thermoshaker.
- Shake the substance in the vial.
- Stop shaking the substance in the vial.
- Move the vial from the thermoshaker to the grid.
Workflow No. 2: Dose, Shake, and Heat using Two Robots Sequentially
This workflow repeats the steps mentioned in the Dose, Shake, and Heat using One Robot workflow and executes further steps using Ned2 robot arm. The additional steps of Ned2 are described below.- Move the vial from the grid to the hotplate.
- Start stirring the substance in the vial.
- Stop stirring the substance in the vial.
- Move the vial from the hotplate to the grid.
Workflow No. 3: Dose, Shake, and Heat using Two Simultaneously Moving Robots
In this workflow, we use both the ViperX and Ned2 robot arms. Both robot arms operate simultaneously but work in their own workspaces.Workflow for ViperX Robot Arm:
- Move the vial from the grid to the thermoshaker using ViperX.
- Shake the substance in the vial.
- Stop shaking the substance in the vial.
- Move the vial from the thermoshaker to the grid using ViperX.
- Repeat steps 1-3 two more times.
- Open the door of the dosing device.
- Move the vial from the grid to the dosing device using Ned2.
- Close the door of the dosing device.
- Place an amount of substance in the vial using the dosing device.
- Stop the dosing device from adding substance to the vial.
- Move the vial from the dosing device to the hotplate using Ned2.
- Start stirring the substance in the vial.
- Stop stirring the substance in the vial.
- Move the vial from the hotplate to the grid using Ned2.
- Repeat steps 1-7 one more time.
Additional Information

Systopia lab is supported by a number of government and industrial sources, including Cisco Systems, the Communications Security Establishment Canada, Intel Research, the National Sciences and Engineering Research Council of Canada (NSERC), Network Appliance, Office of the Privacy Commissioner of Canada, and the National Science Foundation (NSF).